Gameboy Color Flock Gauge Mount V1
Here’s a quick run down for my Gameboy Color Flock Gauge Mount V1:
Materials needed:
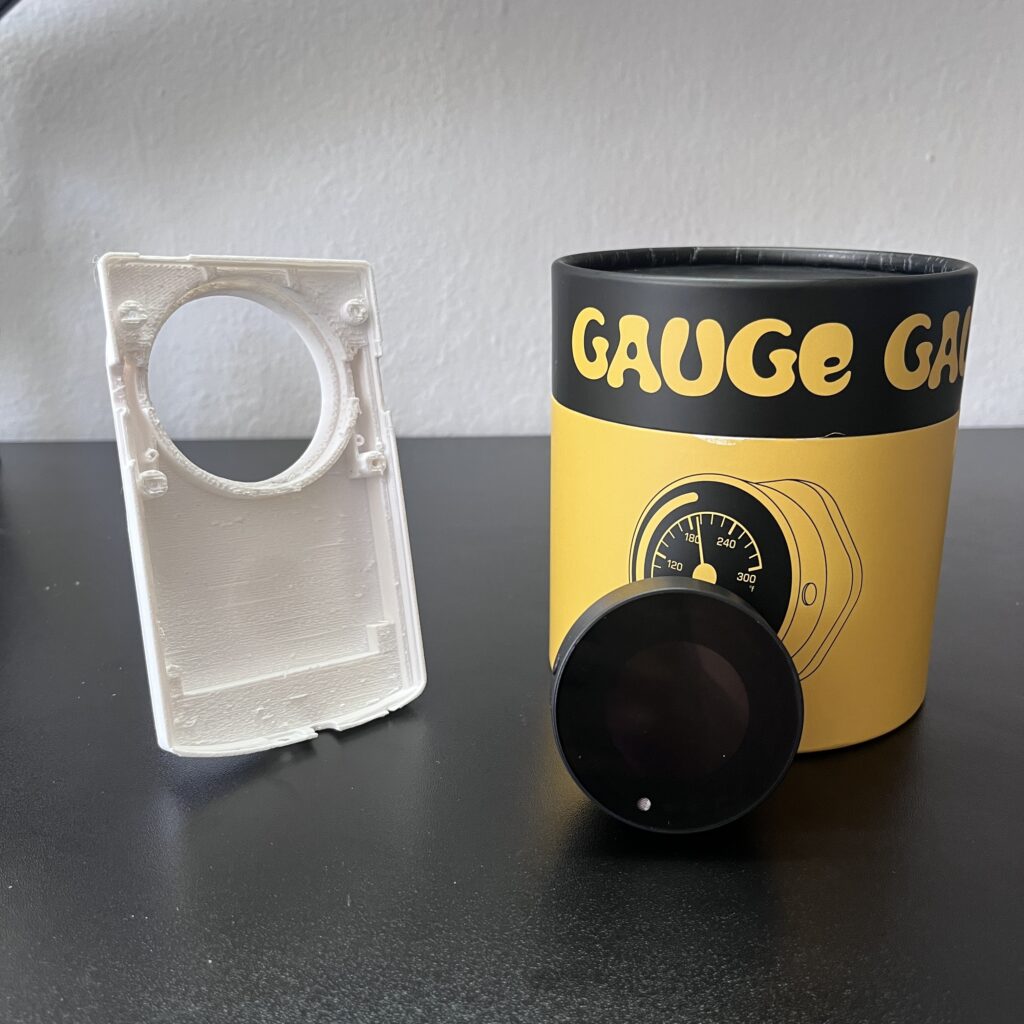
- Buy a Flock Gauge (found here)
- 3D print of Gameboy Flock Gauge Back Shell V1 (stl file download here)
- 3D print of Draklore Flock Lock (available for download here)
- Buy a Gameboy Color Replacement Shell (found on eBay, example here)
- Buy a 17mm Ball Joint Car Phone Holder (found on Amazon examples here and here)
- 3D print of 17mm Ball Joint Nut *if not supplied by your phone holder purchase* (available for download here)
For your convenience, all 3D print .stl files can be downloaded here.
Steps:
- Press in Flock gauge into 3D printed back shell (it’s a snug fit and may require slight sanding depending on what printer was used)
- Install Draklore Flock Lock to secure gauge in place
- Assemble front Gameboy shell and glass screen. Buttons can be glued in place
- Join back shell and front shell and secure with screws
- Securely mount car phone holder inside vehicle. Articulate and tighten down in a position that minimizes movement
- Install Gameboy gauge assembly on phone mount and secure with locking nut
- Set up your Flock gauge and enjoy!
If you have any feedback or questions, feel free to comment or send me a message on instagram @milkandkoukis.
For further background explanation and details continue below.


Disclaimer: This project was created for fun as a personal hobby. It uses various components and models assembled into a custom product. I do not intend to profit from it, and no copyright or trademark infringement is intended.
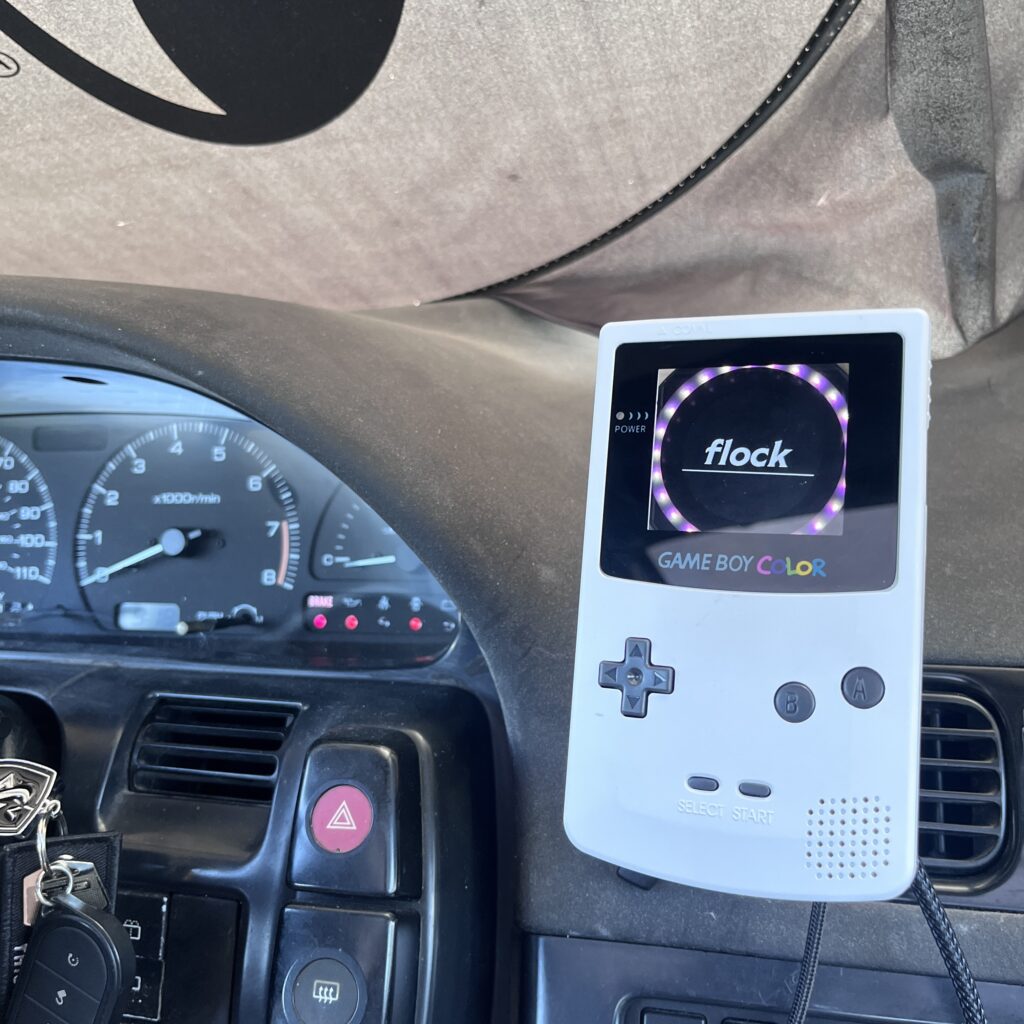
Back Shell – Gameboy Color Flock Gauge Mount V1
Nothing screams the ’90s like a Game Boy. I’ve always thought it’d be cool to have an APEXi Power FC or a COBB Accessport designed like a Game Boy to complement a ’90s-era sh*tbox. While tracking the production of the Flock Gauge, I knew it would be the perfect product to turn into a Gameboy. Once I received my Flock gauge I got to work.
I bought a Gameboy color replacement shell and roughly cut away to get an idea of how the gauge should fit. With the power of the internet and various makers, I modified and pieced together the back shell with the measurements I took from the chopped shell.
The main part of the shell is derived from BRYANU’s design available for purchase on cults.com here. After some modification to that file, I also added a phone mount derived from aborchew’s design available for download at printables.com here.
This component will need to be 3D printed. Ideally in a material like PETG that will withstand the heat in the car. When pressing the gauge in, I recommend using both thumbs and palms and gently apply even pressure. If the fit is too tight, lightly sand some material away to allow for the gauge to slide in. Make sure the gauge is clocked correctly, buttons should be on the sides at 3 o’clock and 9 o’clock.

Draklore Flock Lock
As I was putting this together, Draklore shared a file for the final piece needed for this build. A nut that threads into the gauge and secures it to the back shell. A lot of great products on their site, go check it out!
Gameboy Color Shell Replacement
When picking out your replacement shell, its important to keep a few things in mind. First make sure your purchase comes with screws, tools, buttons, and a screen replacement. Another thing to note is some shells do not come with the Nintendo logo. Unfortunately I missed this detail and have a logo-less shell. Its also important to note this mode is intended for Gameboy Colors, not any other model.
Gameboy modders even have some screens that are larger than original. If you want your viewing window to have a bit more room, look into the Q5 lens replacement (may require some trimming to the front shell).
When putting the shell together for this mod, since there will be no Gameboy board, the buttons should be glued into place and will have no function beside decoration. Afterall, this is just a holder for the gauge. (See below for details on future improvements).
Once the front shell is assembled, screw it together with the back shell assembly. Note: Gameboys utilize tri-wing screws as well as phillips head screws.

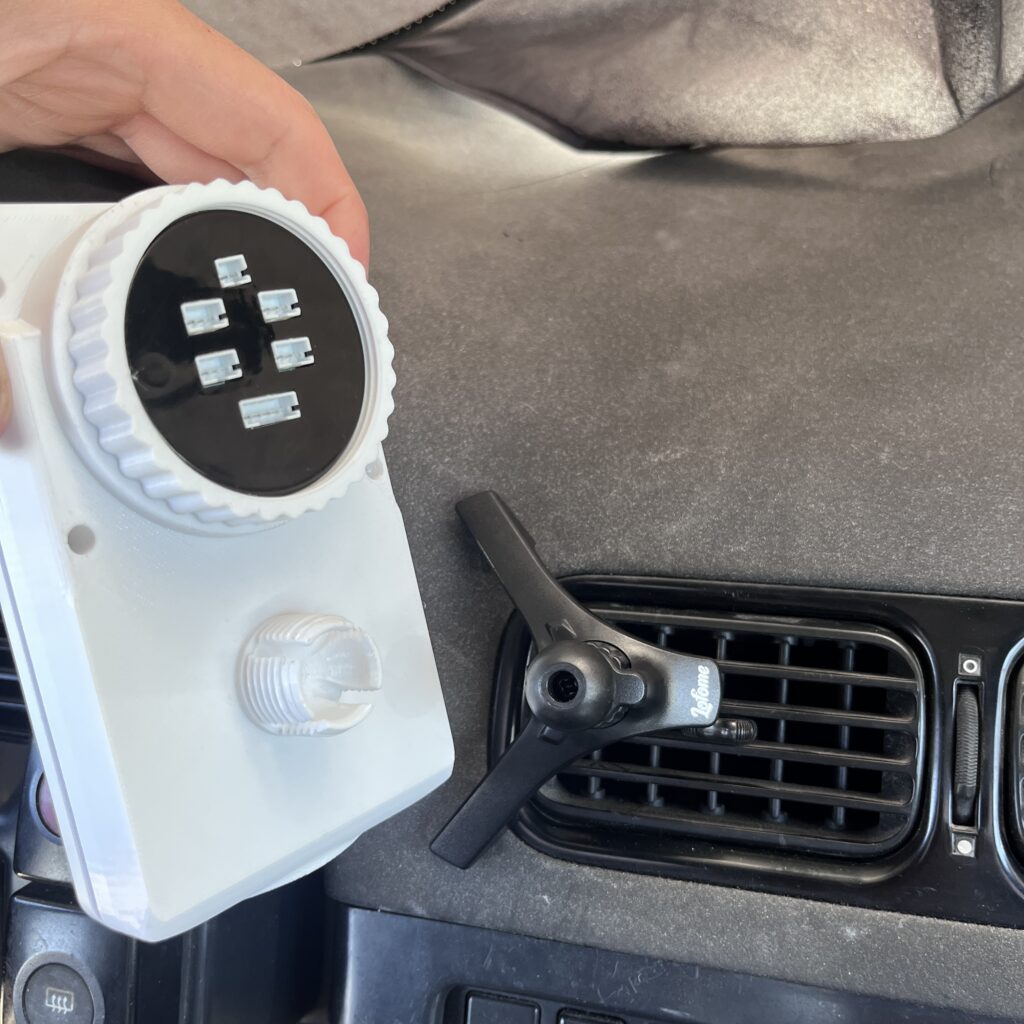
Phone Holder
Now that the assembly is put together, you need a place to mount to your car. I opted for using a universal phone mount to allow for articulation and ease of use in multiple vehicles. These are the typical vent mounts that tighten down and the Gameboy is joined with a 17mm ball joint. Some phone holder products come with a locking nut, but if yours did not, print the locking nut found in the .stl file downloads.
I found the product that works best for me is the one found here. This allows for rotation of the hook that latches onto the car vents, and the V-shape allows for sturdier mounting. Below is how I have it installed in my S13 currently. Find a position that limits the movement of the car vent.
After your mount is on the car, all that’s left to do is press in the Gameboy Flock Gauge assembly to the ball joint and lock into place with a nut.


Future Improvements
First and foremost, I am currently working on adding buttons on the side of the shell so that the gauge buttons can be pressed. This will make the gauge buttons accessible as intended. As of now, you can stick a small screw driver or allen key to switch the gauge into settings mode. Hoping to have the buttons available for download as soon as possible.
Another detail I noticed when putting this together is the Flock gauge is circular, and the Gameboy viewing window is square. Some of the LED’s surrounding the gauge are obstructed from view. Ideally, the entirety of the gauge face should be viewable. Like mentioned before there are some screen replacements that are slightly larger to help with this without straying away from the classic Gameboy look. For now I think it works great, but there’s definitely some room for improvement.
I hope you enjoy this mod as much as I enjoyed putting it together. If you have any feedback or questions, feel free to comment or send me a message on instagram @milkandkoukis.
stay safe and do better!